Productivity
3 Quick Methods to Split Cells in Excel
Split Excel cells into numerous cells by following the step-by-step instructions. This article will show you how to split cells in Excel.
Just like columns, you can hide and unhide rows in your Excel sheet as well. In contrast to freezing rows, you will find it useful to hide rows that you no longer need instead of irrevocably erasing the information from your spreadsheets.
You may subsequently unhide the hidden cells by right-clicking and unhiding the specific rows. You may also go to the "Format" menu and unhide all concealed rows. This function is very useful if you've concealed numerous rows in a huge spreadsheet and it helps you on how to unhide rows in excel.
In general, hidden rows in a spreadsheet are very straightforward to locate.
The easiest way to find a hidden row is to search for a double-line among the row headers. Another clue that some rows have been suppressed is a skewed arrangement of data. Usually, the row numbers would be 1, 2, 3, 4, and so on. However for this scenario, we will see row 7 just beneath row 3, implying that rows 4, 5, and 6 have already been suppressed.
Step 1: First, you need to select the rows that you want to unhide. You can also just select one row above and then another row below or any other rows that you wish to unhide. Then just tap on right-click and then select the unhide option.
Step 2: This will make the hidden rows visible again. Then you will notice these rows are being displayed on the screen in the table. Now if you want to print that particular sheet then you will see that appear even on the printed copy.
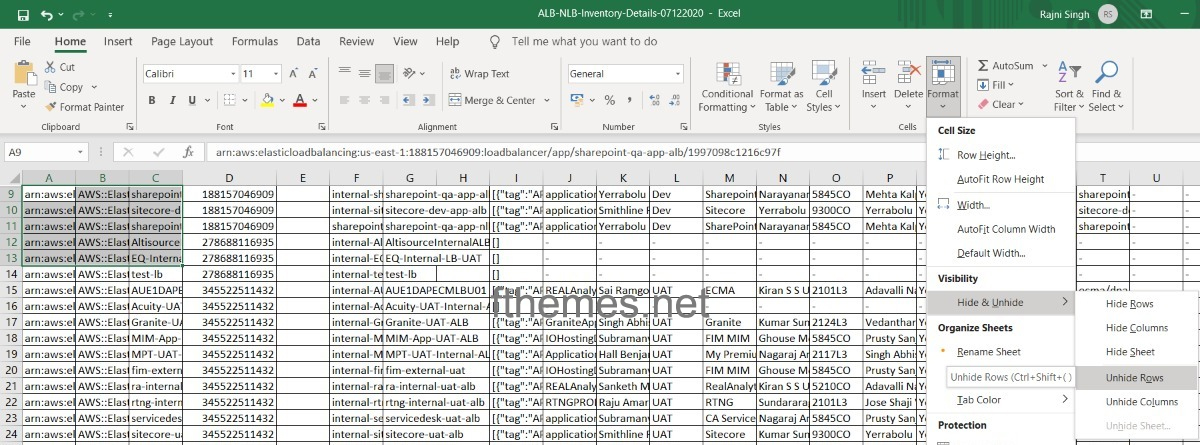
Step 1: To unhide all hidden rows in excel, you need to first reach out to the home tab.
Step 2: Next, you need to tap on the “format” option which is located on the right-hand side of the toolbar.
Step 3: Now you need to move to the visibility section to find some more options that will allow you to hide and unhide both the rows and columns in a spreadsheet.
Step 4: After that, move to the hide and unhide option.
Step 5: Next, you need to select the “unhide rows” option from the list. You will notice that all the hidden rows have been revealed.
Note: A special feature will help you unhide rows that too in your own order throughout a large spreadsheet.
There is a shortcut on how to unhide top rows in excel as well as on how to unhide rows in excel. You just need to follow these steps carefully.
By using the options, Excel makes it very easy to conceal and reveal rows. Displaying a concealed row if its above the first visible row in the worksheet is more difficult.
For example, if you conceal rows 1 through 5, Excel will faithfully execute your commands. If you wish to reveal any of these rows later, the answer isn't so apparent.
Follow these steps accordingly in order to unhide top rows in excel:
Step 1: First, you need to press F5. This will guide you to the dialogue box.
Step 2: Now just enter the number of the row range that you wish to unhide in the reference field that is displayed at the bottom of the dialogue box. Take, for example, if you want to unhide rows 2 through 3, then you need to enter 2:3. And the same is for row 1 that is 1:1.
Step 3: Next tap on OK. The rows that you have selected have been selected even though you can’t see them on the screen.
Step 4: Next, choose rows from the format menu and then tap on the unhide option to unhide them.
Hiding and unhiding of rows and columns is a routine procedure that many users accept as normal. Nevertheless, basic actions, such as unhiding only one row or column inside a concealed set, often trip up Excel users. Other users are unaware of easy keyboard instructions for concealing and revealing columns or rows.
In this post, we'll go through these strategies and also two effective options for individually hiding and unhiding rows and columns. You will also learn how to re-enable an Excel keyboard shortcut that has been deactivated in any Windows OS since Windows XP.
Let's start with the standard methods for concealing rows and columns. Going ahead, we'll just discuss about rows. If you need to hide or unhide columns, simply substitute the term Row with Column in any menu options that we describe.
To begin, choose the row or rows you want to conceal or unhide, and then follow these steps:
Small Tip: Remember that to unhide rows, you must first pick rows on each side of the concealed set.
You may also choose a row or multiple rows and then press Ctrl-9.
Ctrl-Shift-9 will reveal the rows.
Use Ctrl-0 (that's a zero) or Ctrl-Shift-0 for columns, accordingly. However, there is a caveat towards the latter shortcut.
Ctrl-Shift-0 (zero) is the default keyboard shortcut for changing the keyboard layout in Windows Vista, Windows 7, and Windows 8. This implies that until you update an archaic Windows option, Ctrl-Shift-0 no longer works in Excel when you upgrade from Windows XP to a higher version of Windows.
You may choose to unhide a single row or column at a time. There are two methods to go about it:
While creating workbooks for someone to use, it's a good idea to limit their access to specific cells, worksheets, or even the whole workbook. Certain cells might include equations that you wouldn't want to be modified, and some worksheets could be private.
Inside an Microsoft Excel worksheet, you may hide and unhide columns and rows, and also hide worksheets within a spreadsheet. A spreadsheet can also be highly secured to limit access to it. A worksheet can as well be printed and kept in physical files to avoid any kind of data loss.
You can reach out to our HubSpot experts to troubleshoot any particular issue you’re facing or have a custom HubSpot development requirement. If you’re having short on resources to take care of the CMS Hub configuration and other day to day HubSpot tasks, check out our HubSpot CMS management service by FThemes.
Talk soon!
Split Excel cells into numerous cells by following the step-by-step instructions. This article will show you how to split cells in Excel.
Learn how to make a pie chart in excel, how to rotate a pie chart in Excel, burst a pie chart, and even construct a 3-dimensional version.
You can rely on excel for the privacy of any file using password protect. To secure your file, you first need to know how to password protect excel.
Leave A Reply