Productivity
How to Move Columns in Excel
In this article, you'll learn where and how to move columns in excel with your cursor and relocate a few of the columns at a moment.
In today's world, everyone uses social media platforms such as Instagram and Facebook. And when we use them, almost all of us run into the same issue: the proportions should be square.
Some people prefer to crop it, while others add borders. However, many of them do not like to crop it, so they resize the image.
A step-by-step tutorial of three different techniques for resizing an image in Photoshop in three different scenarios is provided below.
Step 1:
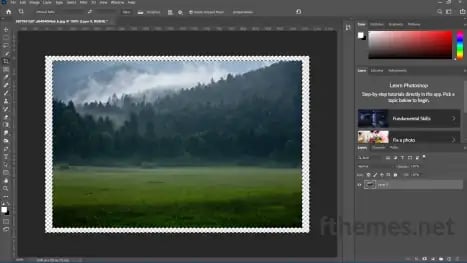
Open Photoshop and select to open the image file that needs to be resized.
Let's start by creating a background for the image. Unlock the background layer by clicking on the lock present on the thumbnail.
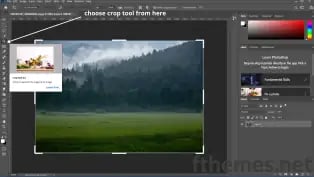
Select the Crop tool from the toolbar or press C.
From the aspect ratio menu, select the proportion of the image that you want to expand.
Zoom in to expand the image. If you want to expand from the center, hold down the ALT key while doing so.
Step 2:
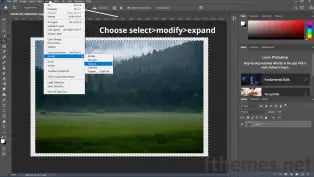
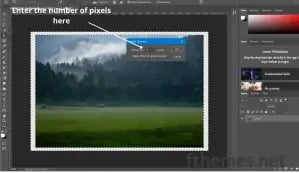
Your image is surrounded by a white border. Hold CTRL and click on the thumbnail of layer 0 to select the borders. Then, hold down CTRL+SHIFT +I which is the inverse selection of the currently selected object. As a result, only the blank area around the image that has been created before gets selected, keeping the original image excluded.
Select > Modify > Expand, expands the selection as much as you need. In the Expand Selection dialog box, you can keep the expansion value around 5 or 4 pixels, and click OK.
Step 3:
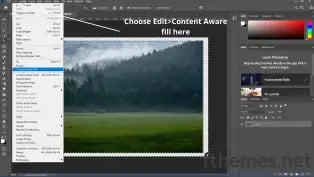
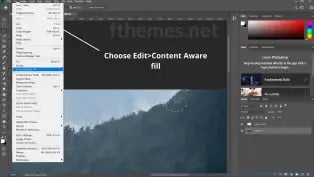
Click on Edit > Content Aware fill to fill up the empty area around the borders of the image. It does a good job by default, but you can also experiment with color adaptation, rotation adaptation, scale, and mirror.
It also lets you choose which areas to sample from, and if you don't want to sample from the subject, you can paint it and it won't sample.
Step 4:
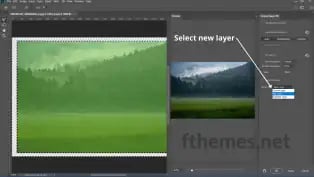
When you're done, select the option output to a new layer to get the filled area on a new or current layer of your choice, and then click OK.
To deselect, press CTRL+D. You can now use the Move tool to remove the cropping marks.
Step 5:
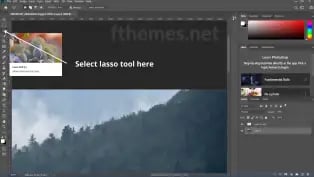
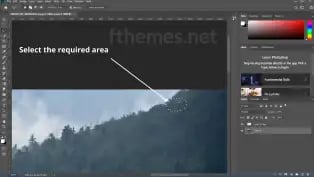
If you notice a specific area that doesn't appear to be proper, you can fix it by selecting the Content Aware tool again. Use the Lasso tool to select a specific area, and hold down the Shift key while selecting to add more area. Then select the Content Aware tool before clicking OK.
If you still don't think the area looks good, adjust the rotation and color adaptation to High or none, depending on your requirements.
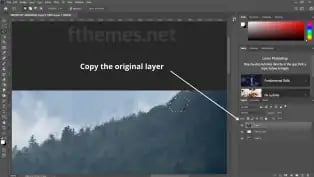
To make a backup of the original image, press Ctrl+J.
If any part of the image still doesn't look right, you can use the Patch tool from the toolbar. You will find this tool in the Spot Healing Brush tool's drop down.
Select the area with which you want to replace the original area, then select Destination from the top toolbar, drag the selected area and drop it to the specific faulty area, and then press CTRL+D to deselect.
Step 6:
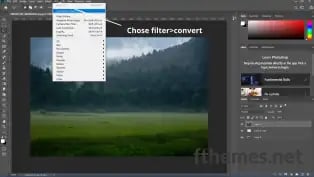
For more modifications, we can conceal some items and use the smart filters.
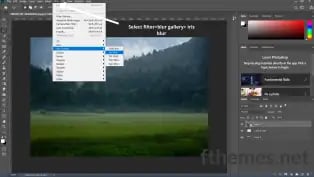
For the smart filter, go to Filter > Convert and press OK. Select Filter > Blur >Iris Blur.
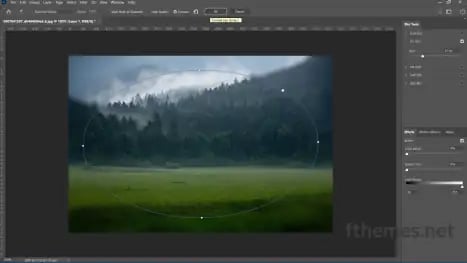
Hold down the ALT key and click on the nodes inside the circle to outline the area where the image should be blurred.
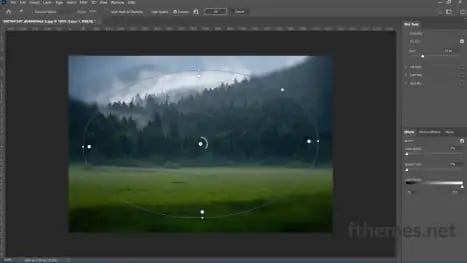
These are the points where the blur begins and ends around the circle's edge. Whatever value you choose, the blur begins at these points and gradually increases until it reaches the edges, and it is the same outside the edge as it is at the edge. Click OK once done.
If you want to restore some of the details, select the mask of the Smart filter, take the brush, and select the color. Then, paint over the area that you want to restore.
You can also include a Curves Adjustment layer. After that, select the mask, take the Brush, a Hard Round Brush, and simply dab. Adjust it by pressing Ctrl+T.
Make sure your opacity and flow are both set to 100%. Open the properties of the mask and increase the feather to create a spotlight.
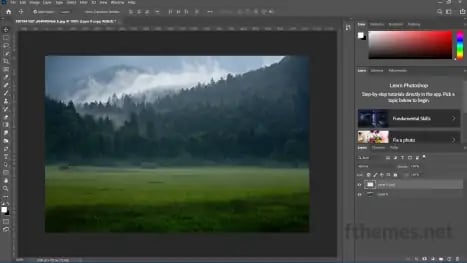
You're done!
This technique can be applied to images with a flat pattern or images that can be repeated in a pattern.
Choose the image you want to resize.
Select the Crop tool. Choose the proportion you want from the Aspect Ratio menu.
You can choose to expand the image area. Now to infuse the empty space around the image.
Use the Rectangular Marquee tool to select the area to mirror or that can be repeated in the image. Press CTRL+J and a layer is formed.
Select Move tool by pressing V in the keyboard. Now, move the layer to the blank area and press CTRL+T, right click on it, and select Flip Vertical if you're mirroring upwards, and vice versa if you're mirroring downwards.
Repeat the previous steps that are mentioned above until the entire blank area has been filled up.
There are often some recurring signs. To correct this, press CTRL+SHIFT+E to merge all layers. Then, while holding Shift, select the Lasso or Polygonal Lasso tool and the Patterns.
Fill it now using the Content Aware Fill, which you can find in Edit > Content Aware Fill and click OK.
When you have a plain, simple, and solid background, you can use this technique. It stretches areas that are devoid of details.
The following are the steps to employing this technique:
Choose the image you want to resize. Select the Crop tool. Choose the proportion you want from the Aspect Ratio menu. Expand the image area to your preference and drag it to the bottom.
Now, hold down CTRL+J. Choose Edit > Content Aware Scale. Stretch the image while holding Shift. Only the parts with no detail and that are solid are stretched. However, after a while, the subject with fewer details is expanded. To avoid this, simply press Enter and then repeat the process.
So, these are three techniques you can use in combination to resize your image in Photoshop when you don't want to crop, lose details, or introduce white borders to your image.
Do let us know in the comments section below if this article has been helpful to you in resolving the resize issues you face while working with images.
You can also reach out to us for troubleshooting any complication that you may come across.
In this article, you'll learn where and how to move columns in excel with your cursor and relocate a few of the columns at a moment.
Gif comprises multiple images at once and creates a kind of video without sound. This post is a step-by-step tutorial to create animated GIF in...
You will learn how to alphabetize in Excel by utilising the Sort and Filter capabilities to order it from A to Z and how to alphabetize by the last...
Leave A Reply